源码之Shuffle
1. Shuffle的核心要点
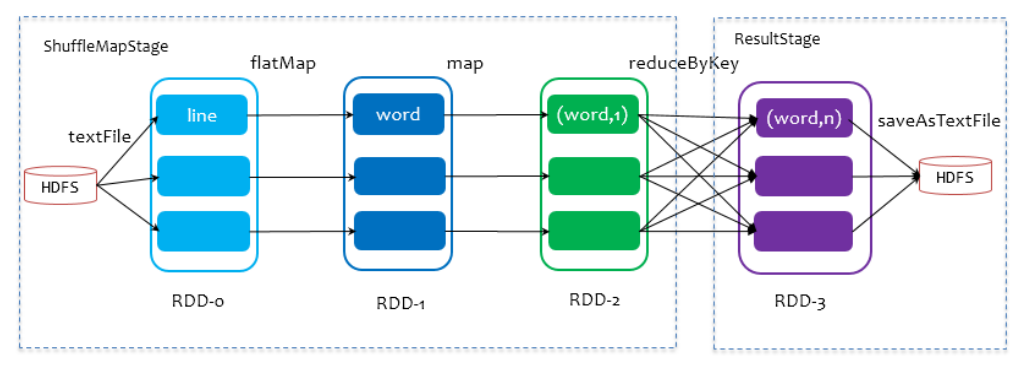 在划分stage时,最后一个stage称为finalStage,它本质上是一个ResultStage对象,前面的所有stage被称为ShuffleMapStage。
ShuffleMapStage的结束伴随着shuffle文件的写磁盘。
ResultStage基本上对应代码中的action算子,即将一个函数应用在RDD的各个partition的数据集上,意味着一个job的运行结束。
2. SortShuffle解析
2.1 普通SortShuffle
在该模式下,数据会先写入一个数据结构,reduceByKey写入Map,一边通过Map局部聚合,一遍写入内存。Join算子写入ArrayList直接写入内存中。然后需要判断是否达到阈值,如果达到就会将内存数据结构的数据写入到磁盘,清空内存数据结构。在溢写磁盘前,先根据key进行排序,排序过后的数据,会分批写入到磁盘文件中。默认批次为10000条,数据会以每批一万条写入到磁盘文件。写入磁盘文件通过缓冲区溢写的方式,每次溢写都会产生一个磁盘文件,也就是说一个Task过程会产生多个临时文件。
最后在每个Task中,将所有的临时文件合并,这就是merge过程,此过程将所有临时文件读取出来,一次写入到最终文件。意味着一个Task的所有数据都在这一个文件中。同时单独写一份索引文件,标识下游各个Task的数据在文件中的索引start offset和end offset。 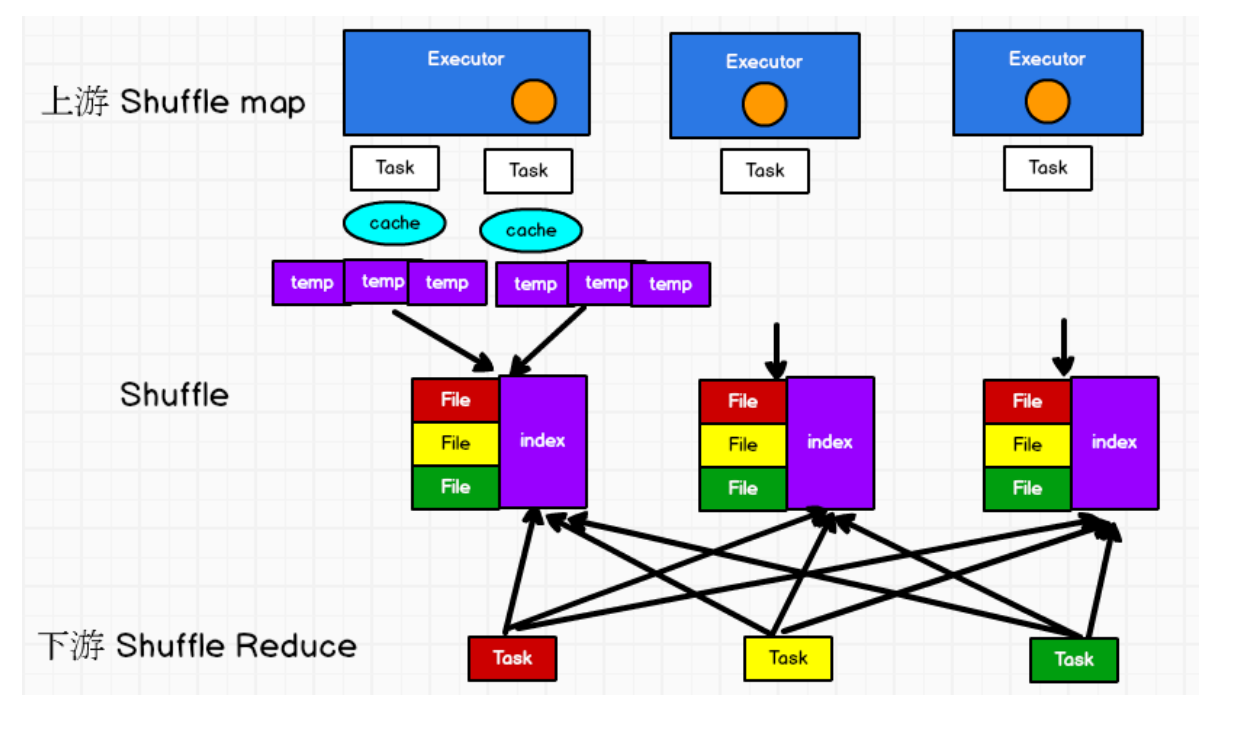
2.2 bypass SortShuffle
bypass运行机制的触发条件如下:
1)shuffle reduce task数量小于等于spark.shuffle.sort.bypassMergeThreshold参数的值,默认为200。
2) 不是聚合类的shuffle算子(比如reduceByKey)。
此时task会为每个reduce端的task都创建一个临时磁盘文件,并将数据按key进行hash然后根据key的hash值,将key写入对应的磁盘文件之中。当然,写入磁盘文件时也是先写入内存缓冲,缓冲写满之后再溢写到磁盘文件的。最后同样会将所有临时磁盘文件都合并成一个磁盘文件,并创建一个单独的索引文件。 该过程的磁盘写机制其实跟未经优化的HashShuffleManager是一模一样的,因为都要创建数量惊人的磁盘文件,只是在最后会做一个磁盘文件的合并而已。因此少量的最终磁盘文件,也让该机制相对未经优化的HashShuffleManager来说,shuffle的read性能会更好。
而该机制与普通SortShuffleManager运行机制的不同在于:不会进行排序。也就是说,启用该机制的最大好处在于,shuffle write过程中不需要进行数据的排序操作,也就节省掉了这部分的性能开销。 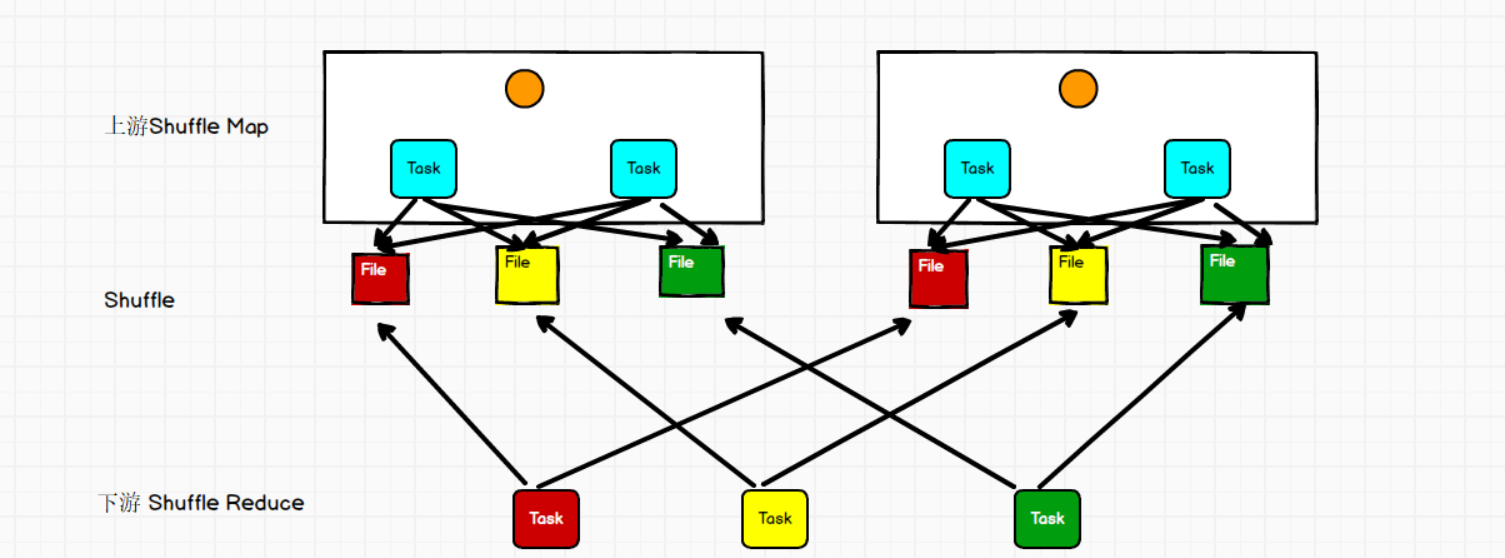
1. Shuffle的写流程
打开ShuffleMapTask.scala文件,里面的runTask(): 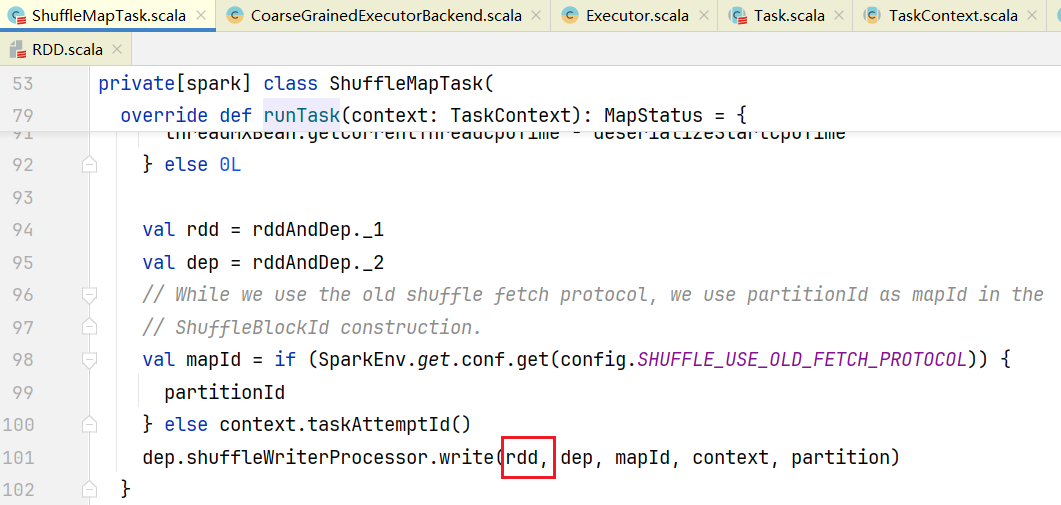 其中shuffleWriterProcessor就是写处理器,点击进入write()方法,查看如何写shuffle的:
 其中manager是shuffleManager,它是一个trait,实现只有SortShuffleManager类,早期版本还有HashShuffleManager类。manager.getWriter()方法里面会根据handle不同生成不同的Writer:
override def getWriter[K, V](
      handle: ShuffleHandle,
      mapId: Long,
      context: TaskContext,
      metrics: ShuffleWriteMetricsReporter): ShuffleWriter[K, V] = {
    val mapTaskIds = taskIdMapsForShuffle.computeIfAbsent(
      handle.shuffleId, _ => new OpenHashSet[Long](16))
    mapTaskIds.synchronized { mapTaskIds.add(mapId) }
    val env = SparkEnv.get
    handle match {
      case unsafeShuffleHandle: SerializedShuffleHandle[K @unchecked, V @unchecked] =>
        new UnsafeShuffleWriter(
          env.blockManager,
          context.taskMemoryManager(),
          unsafeShuffleHandle,
          mapId,
          context,
          env.conf,
          metrics,
          shuffleExecutorComponents)
      case bypassMergeSortHandle: BypassMergeSortShuffleHandle[K @unchecked, V @unchecked] =>
        new BypassMergeSortShuffleWriter(
          env.blockManager,
          bypassMergeSortHandle,
          mapId,
          env.conf,
          metrics,
          shuffleExecutorComponents)
      case other: BaseShuffleHandle[K @unchecked, V @unchecked, _] =>
        new SortShuffleWriter(other, mapId, context, shuffleExecutorComponents)
    }
}handle是参数从dep.shuffleHandle传入进来的,那么hadle是怎么产生的呢?点击dep.shuffleHandle进入Dependency.scala,可以看到是通过registerShuffle()方法进行初始化的:
点击进入registerShuffle()的实现方法:
override def registerShuffle[K, V, C](
      shuffleId: Int,
      dependency: ShuffleDependency[K, V, C]): ShuffleHandle = {
        // 是否可以忽略MergeSort,也就是说是否能够不使用归并排序
    if (SortShuffleWriter.shouldBypassMergeSort(conf, dependency)) {
      new BypassMergeSortShuffleHandle[K, V](
        shuffleId, dependency.asInstanceOf[ShuffleDependency[K, V, V]])
    } else if (SortShuffleManager.canUseSerializedShuffle(dependency)) {
      new SerializedShuffleHandle[K, V](
        shuffleId, dependency.asInstanceOf[ShuffleDependency[K, V, V]])
    } else {
      // Otherwise, buffer map outputs in a deserialized form:
      new BaseShuffleHandle(shuffleId, dependency)
    }
}点击进入shouldBypassMergeSort()方法:
private[spark] object SortShuffleWriter {
  def shouldBypassMergeSort(conf: SparkConf, dep: ShuffleDependency[_, _, _]): Boolean = {
    // We cannot bypass sorting if we need to do map-side aggregation.
    // 预聚合的话,就返回false, 所以使用BypassMergeSortShuffleHandle就不能预聚合
    if (dep.mapSideCombine) {
      false
    } else {
      // 默认200, 也就是分区不能超过200就忽视归并排序
      val bypassMergeThreshold: Int = conf.get(config.SHUFFLE_SORT_BYPASS_MERGE_THRESHOLD)
      dep.partitioner.numPartitions <= bypassMergeThreshold
    }
  }
}那如何得到SerializedShuffleHandle呢,点击查看canUseSerializedShuffle()方法:
 def canUseSerializedShuffle(dependency: ShuffleDependency[_, _, _]): Boolean = {
    val shufId = dependency.shuffleId
    val numPartitions = dependency.partitioner.numPartitions
    // 序列化器是否支持序列化对象重定位,也就是将序列化对象能够关联起来能够放到一起, 默认java的序列化器不支持,
    // 只有kryo支持
    if (!dependency.serializer.supportsRelocationOfSerializedObjects) {
      log.debug(s"Can't use serialized shuffle for shuffle $shufId because the serializer, " +
        s"${dependency.serializer.getClass.getName}, does not support object relocation")
      false
      // 不能预聚合
    } else if (dependency.mapSideCombine) {
      log.debug(s"Can't use serialized shuffle for shuffle $shufId because we need to do " +
        s"map-side aggregation")
      false
      // 如果分区数不能超过16777216,也就是不能超过2的24次方
    } else if (numPartitions > MAX_SHUFFLE_OUTPUT_PARTITIONS_FOR_SERIALIZED_MODE) {
      log.debug(s"Can't use serialized shuffle for shuffle $shufId because it has more than " +
        s"$MAX_SHUFFLE_OUTPUT_PARTITIONS_FOR_SERIALIZED_MODE partitions")
      false
    } else {
      log.debug(s"Can use serialized shuffle for shuffle $shufId")
      true
    }
}总结如下规则得到不同haddle: 点击进入writer.write()方法,发现是一个抽象方法,如果是BaseShuffleHandle得到的是SortShuffleWriter, 点击进入SortShuffleWriter.scala的wirte()方法:
 那么如何排序的呢,点击进入insertAll()方法:
def insertAll(records: Iterator[Product2[K, V]]): Unit = {
    // 是否定义预聚合
    val shouldCombine = aggregator.isDefined

    if (shouldCombine) {// 如果预聚合
      // Combine values in-memory first using our AppendOnlyMap
      val mergeValue = aggregator.get.mergeValue
      val createCombiner = aggregator.get.createCombiner
      var kv: Product2[K, V] = null
      // 更新逻辑函数, 相同的key的value进行更新
      val update = (hadValue: Boolean, oldValue: C) => {
        if (hadValue) mergeValue(oldValue, kv._2) else createCombiner(kv._2)
      }
      while (records.hasNext) {
        addElementsRead()
        kv = records.next()
        // 数据存放是一个Map结构,传入参数:得到key的分区, 更新逻辑函数
        map.changeValue((getPartition(kv._1), kv._1), update)
        // 如果Map结构数据不断增大,可能需要溢写磁盘
        maybeSpillCollection(usingMap = true)
      }
    } else {
      // 如果不是预聚合,就将数据放入缓存中
      while (records.hasNext) {
        addElementsRead()
        val kv = records.next()
        // 直接将结果放到缓存内存
        buffer.insert(getPartition(kv._1), kv._1, kv._2.asInstanceOf[C])
        maybeSpillCollection(usingMap = false)
      }
    }
}点击查看溢写磁盘逻辑:
private def maybeSpillCollection(usingMap: Boolean): Unit = {
  var estimatedSize = 0L
  if (usingMap) {
    // 预估map的大小
    estimatedSize = map.estimateSize()
    // 判断是否需要溢写
    if (maybeSpill(map, estimatedSize)) {
      // 得到新的map结构
      map = new PartitionedAppendOnlyMap[K, C]
    }
  } else {
    // 预估map的大小
    estimatedSize = buffer.estimateSize()
    // 判断是否需要溢写
    if (maybeSpill(buffer, estimatedSize)) {
      // 得到buffer
      buffer = new PartitionedPairBuffer[K, C]
    }
  }

  if (estimatedSize > _peakMemoryUsedBytes) {
    _peakMemoryUsedBytes = estimatedSize
  }
}点击maybeSpill()方法,查看判断溢写逻辑:
protected def maybeSpill(collection: C, currentMemory: Long): Boolean = {
    var shouldSpill = false
    // 如果当前内存大于5M
    if (elementsRead % 32 == 0 && currentMemory >= myMemoryThreshold) {
      // 计算需要申请的内存
      val amountToRequest = 2 * currentMemory - myMemoryThreshold
      val granted = acquireMemory(amountToRequest)
      // 现有使用的内存加上申请的内存
      myMemoryThreshold += granted
      // 如果当前内存仍然比现有要使用内存大,那么就进行溢写
      shouldSpill = currentMemory >= myMemoryThreshold
    }
    // 另外如果要读取的元素数目也比配置的强制溢写数目大,也需要强制溢写数目
    shouldSpill = shouldSpill || _elementsRead > numElementsForceSpillThreshold
    // 如果需要溢写
    if (shouldSpill) {
      _spillCount += 1
      logSpillage(currentMemory)
      // 进行溢写磁盘
      spill(collection)
      _elementsRead = 0
      _memoryBytesSpilled += currentMemory
      // 释放内存
      releaseMemory()
    }
    shouldSpill
}其中myMemoryThreshold读取的配置spark.shuffle.spill.initialMemoryThreshold,默认为5M, numElementsForceSpillThreshold默认读取配置spark.shuffle.spill.numElementsForceSpillThreshold,默认是2^31-1(Integer.MAX_VALUE)。
点击进入spill()方法发现是一个抽象方法 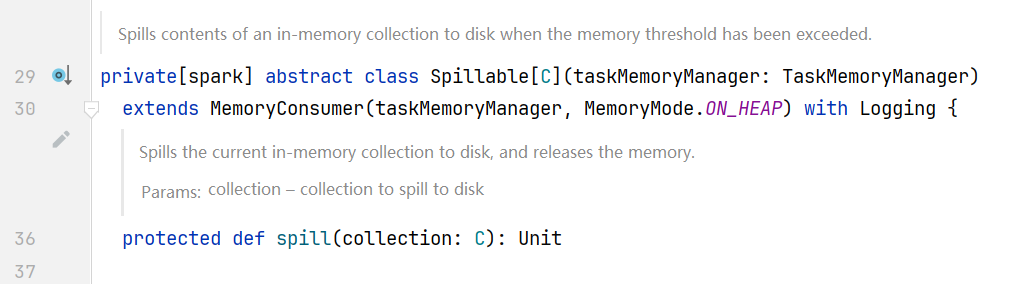 查找实现类ExternalSorter.scala的spill()方法:
override protected[this] def spill(collection: WritablePartitionedPairCollection[K, C]): Unit = {
  // 不同分区按照分区进行排序,相同分区的数据按照key进行排序
    val inMemoryIterator = collection.destructiveSortedWritablePartitionedIterator(comparator)
    // 溢写磁盘
    val spillFile = spillMemoryIteratorToDisk(inMemoryIterator)
    spills += spillFile
}点击spillMemoryIteratorToDisk()方法: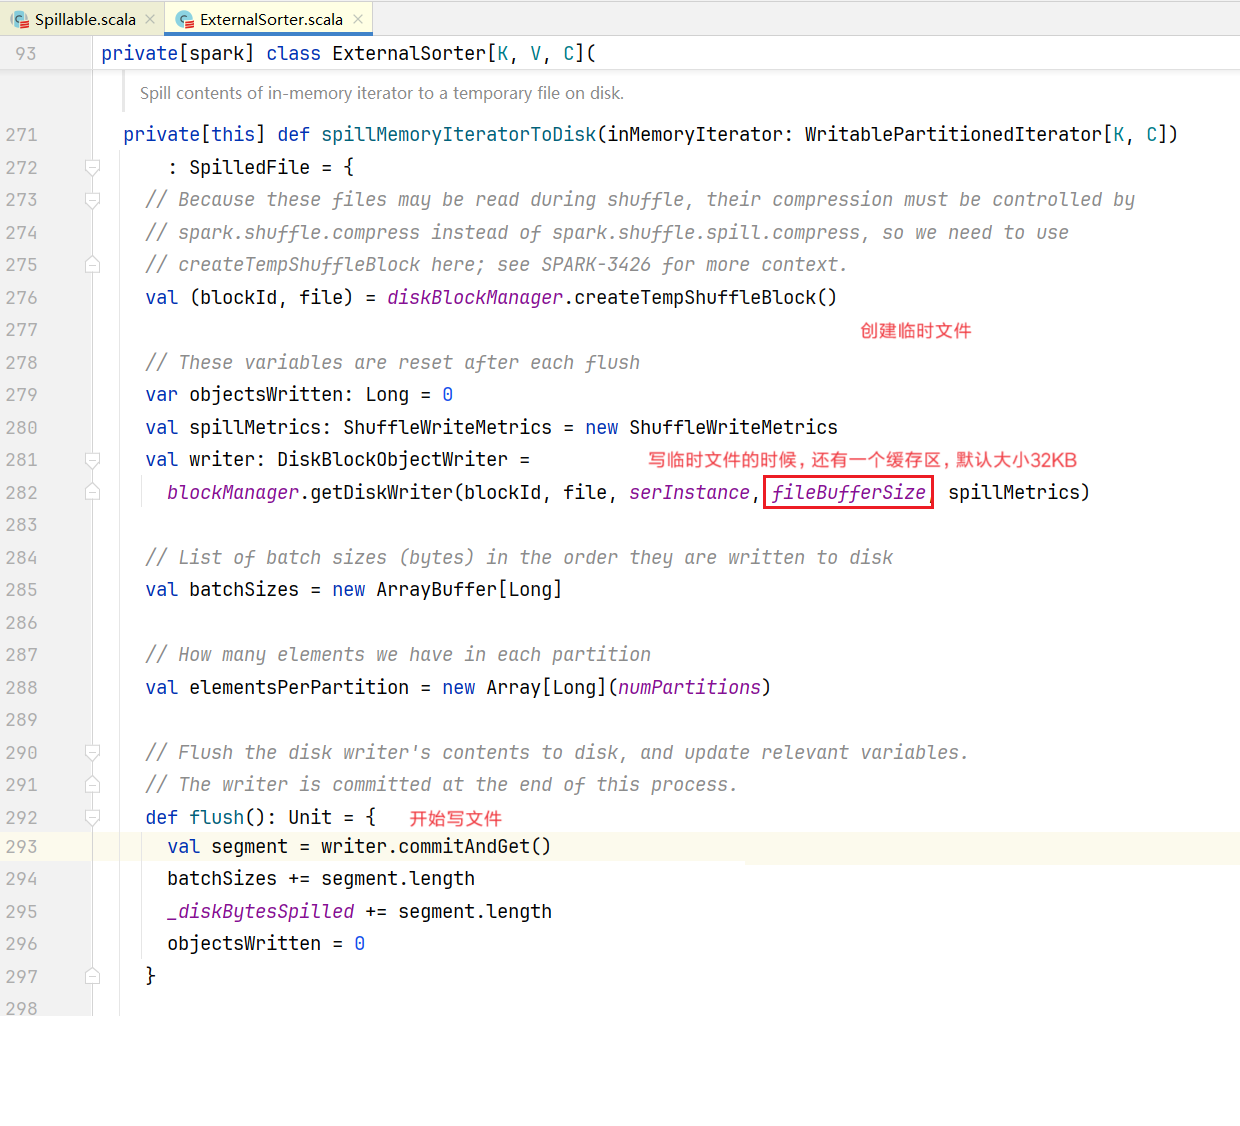 插入数据操作就完成了, 回到最开始SortedShuffledWriter.scala文件,里面的write()
 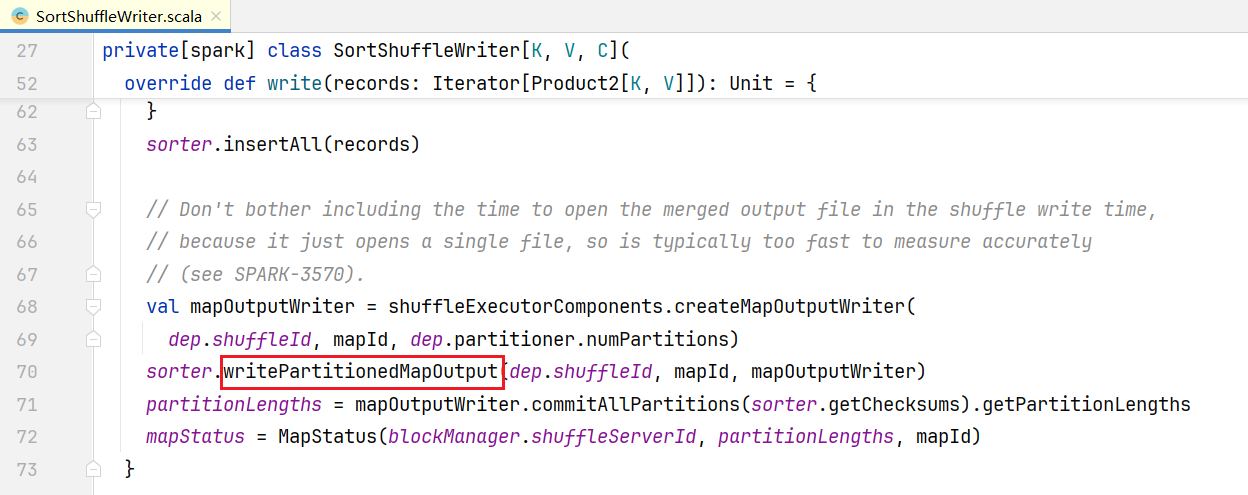 之前溢写很多temp文件,调用writePartitionedMapOutput()进行合并:
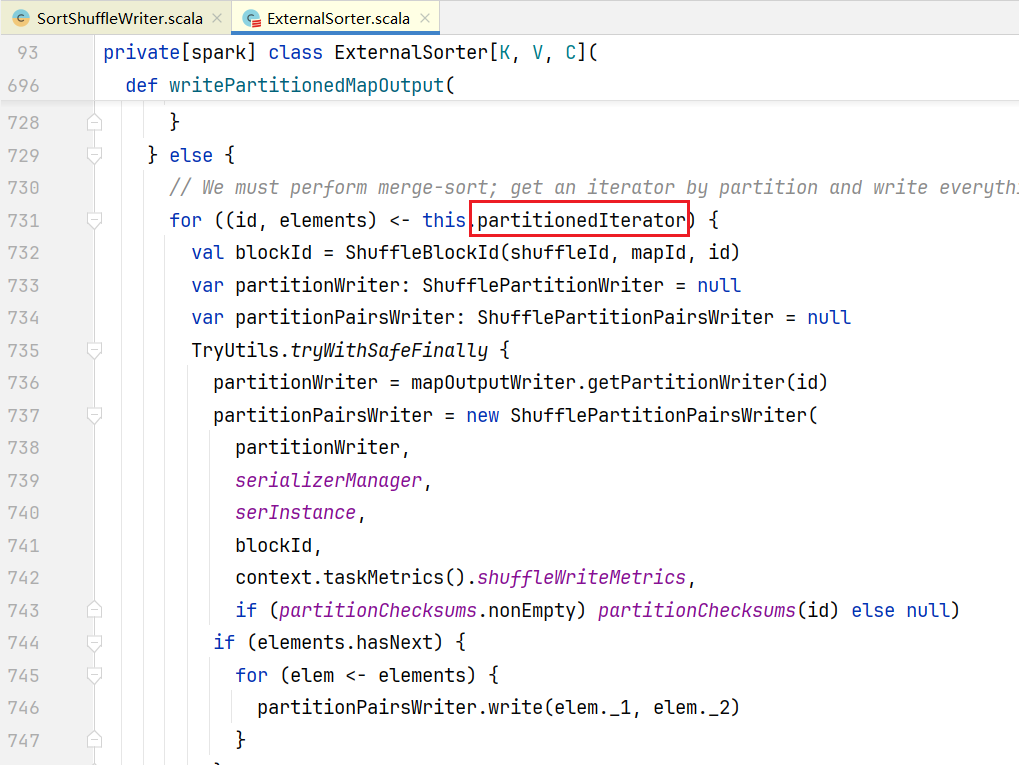 点击partitionedIterator, 查看代码:
 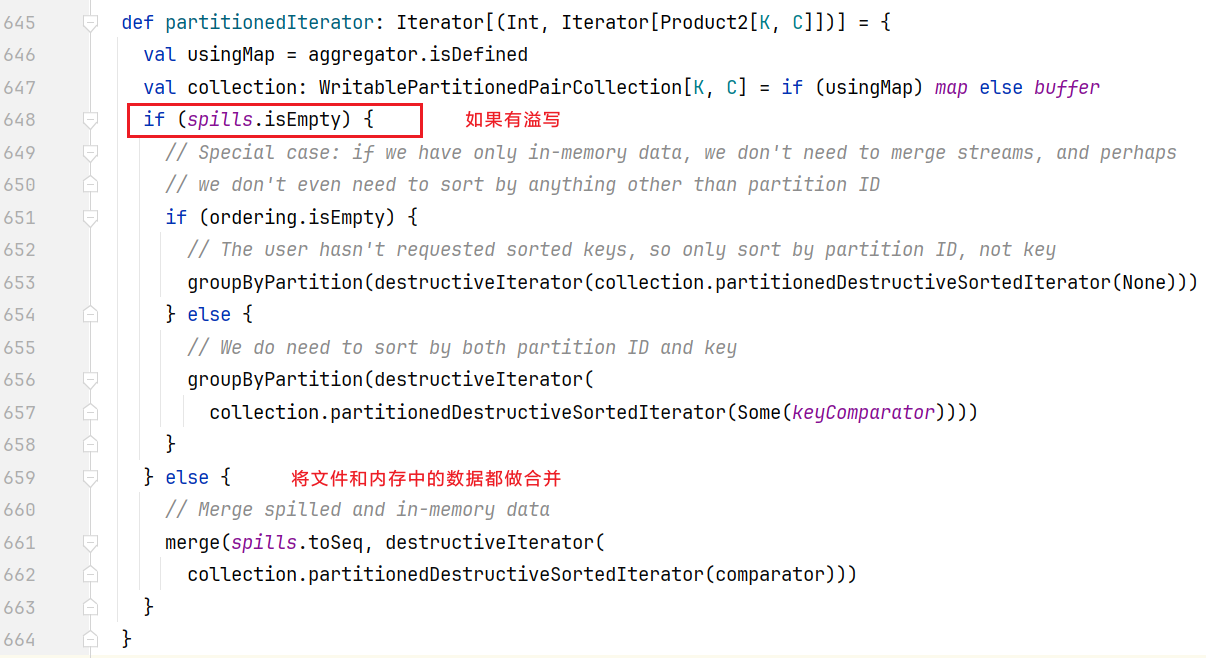 点击merge()方法,查看合并逻辑:
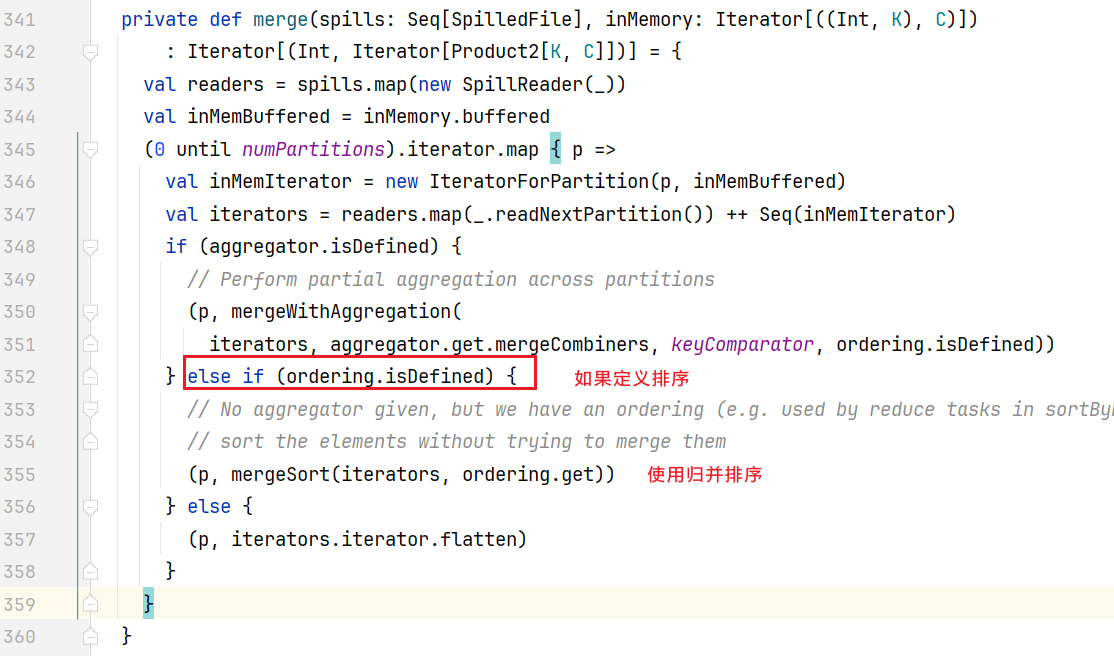 进入mergeSort()方法:
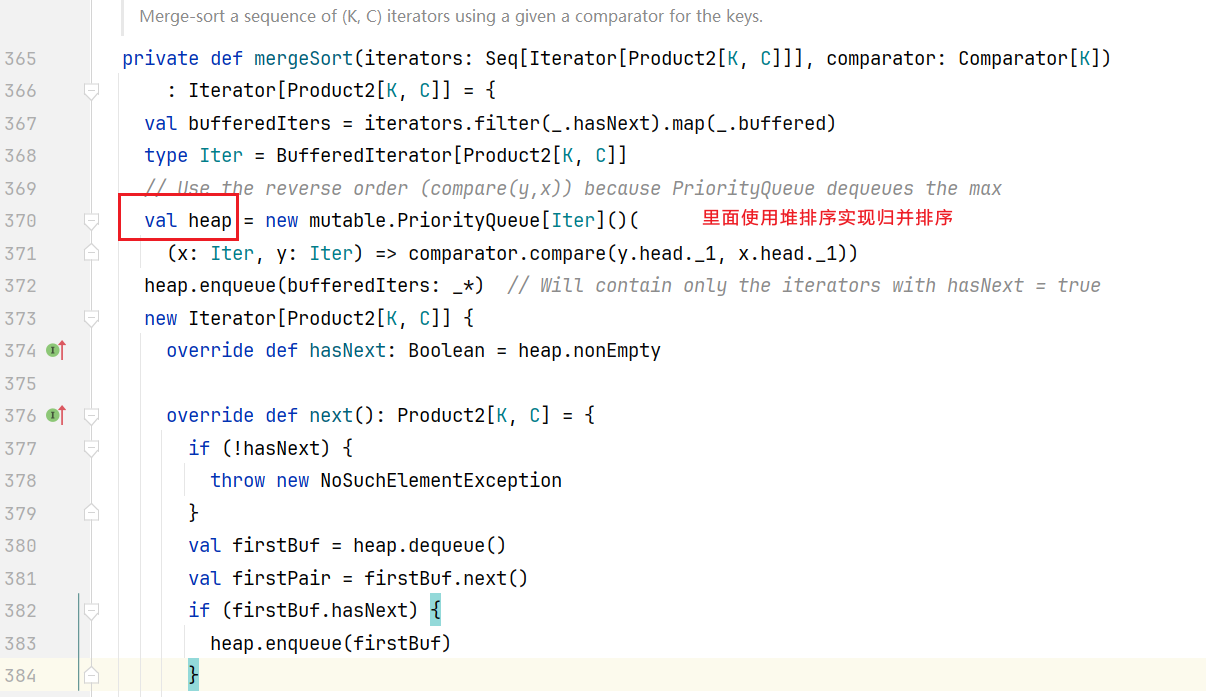 排完序后就按照先后合并到一起了。后面进行执行commitAllPartitions()方法:
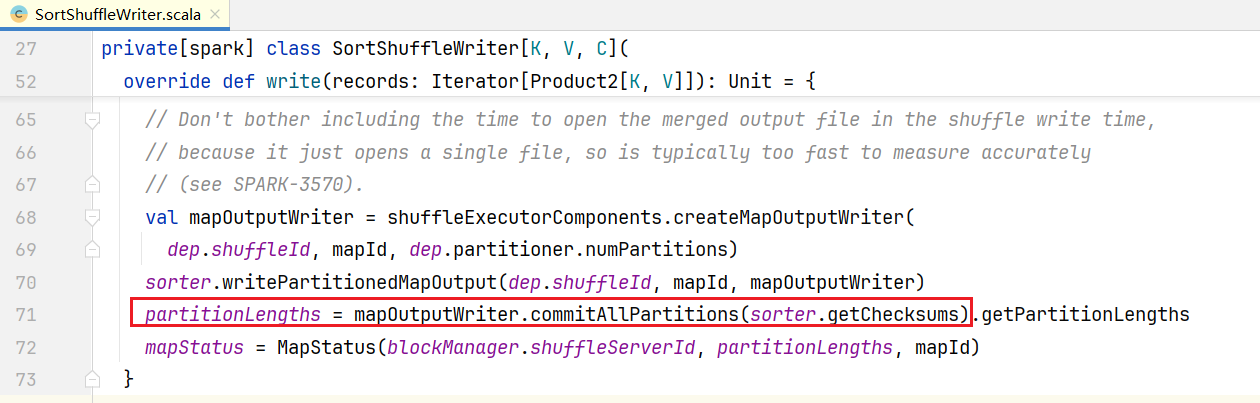 有一个commit提交操作,点击进入commitAllPartitions(),它是一个抽象类,在LocalDiskShuffleMapOutputWriter.java中有方法实现:
@Override
  public MapOutputCommitMessage commitAllPartitions(long[] checksums) throws IOException {
    ......

    cleanUp();
    // 找到输出的临时文件
    File resolvedTmp = outputTempFile != null && outputTempFile.isFile() ? outputTempFile : null;
    log.debug("Writing shuffle index file for mapId {} with length {}", mapId,
        partitionLengths.length);
    // 写数据操作
    blockResolver
      .writeMetadataFileAndCommit(shuffleId, mapId, partitionLengths, checksums, resolvedTmp);
    return MapOutputCommitMessage.of(partitionLengths);
}点击writeMetadataFileAndCommit()方法
def writeMetadataFileAndCommit(
      shuffleId: Int,
      mapId: Long,
      lengths: Array[Long],
      checksums: Array[Long],
      dataTmp: File): Unit = {
    // 获取索引文件
    val indexFile = getIndexFile(shuffleId, mapId)
    // 生成临时索引文件
    val indexTmp = createTempFile(indexFile)
    ......

    try {
      val dataFile = getDataFile(shuffleId, mapId)
      // There is only one IndexShuffleBlockResolver per executor, this synchronization make sure
      // the following check and rename are atomic.
      this.synchronized {
        val existingLengths = checkIndexAndDataFile(indexFile, dataFile, lengths.length)
        if (existingLengths != null) {
          // Another attempt for the same task has already written our map outputs successfully,
          // so just use the existing partition lengths and delete our temporary map outputs.
          System.arraycopy(existingLengths, 0, lengths, 0, lengths.length)
          if (checksumEnabled) {
            val existingChecksums = getChecksums(checksumFileOpt.get, checksums.length)
            if (existingChecksums != null) {
              System.arraycopy(existingChecksums, 0, checksums, 0, lengths.length)
            } else {
               // 写文件
              writeMetadataFile(checksums, checksumTmpOpt.get, checksumFileOpt.get, false)
            }
          }
          if (dataTmp != null && dataTmp.exists()) {
            dataTmp.delete()
          }
        } else {
          val offsets = lengths.scanLeft(0L)(_ + _)
          // 写文件
          writeMetadataFile(offsets, indexTmp, indexFile, true)

          if (dataFile.exists()) {
            dataFile.delete()
          }
          if (dataTmp != null && dataTmp.exists() && !dataTmp.renameTo(dataFile)) {
            throw new IOException("fail to rename file " + dataTmp + " to " + dataFile)
          }

          // write the checksum file
          ......
        }
      }
    } finally {
      ......
    }
}可以看见代码支持多次执行写操作,做了文件是否存在判断,点击进入writeMetadataFile()方法: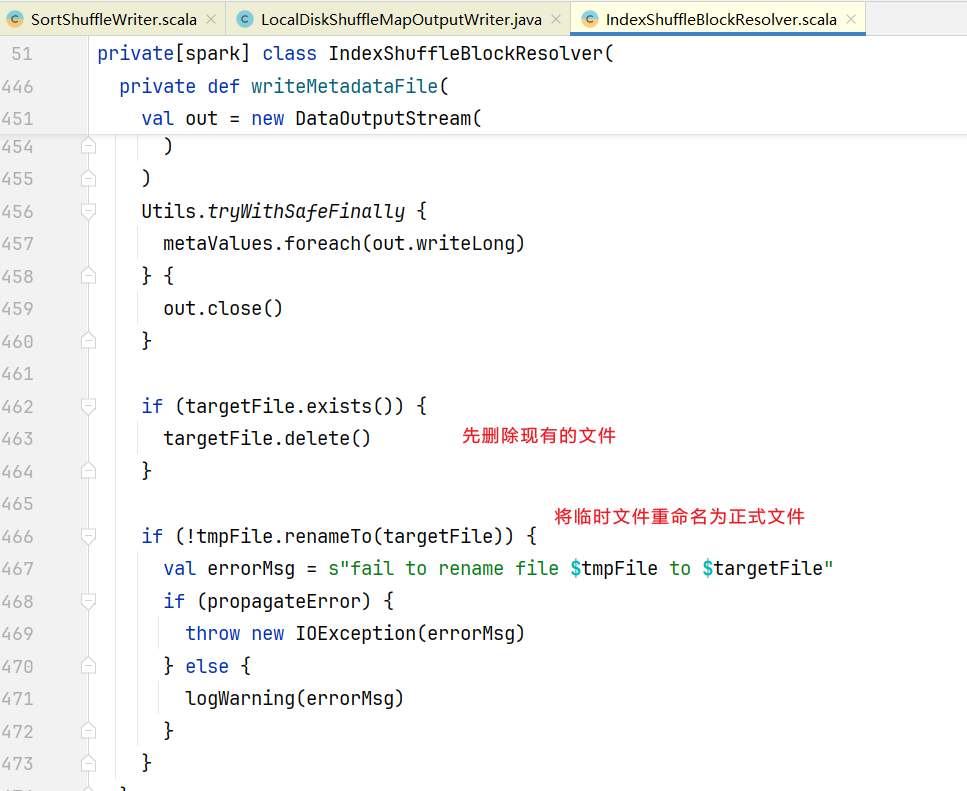
2. Shuffle的读流程
Shuffle操作写完毕后,需要在Shuffle后一个阶段(也就是ResultStage)进行读操作,ResultStage里面只有一个ShuffleRDD, 打开DAGScheduler.scala, 进入submitMissingTasks()方法: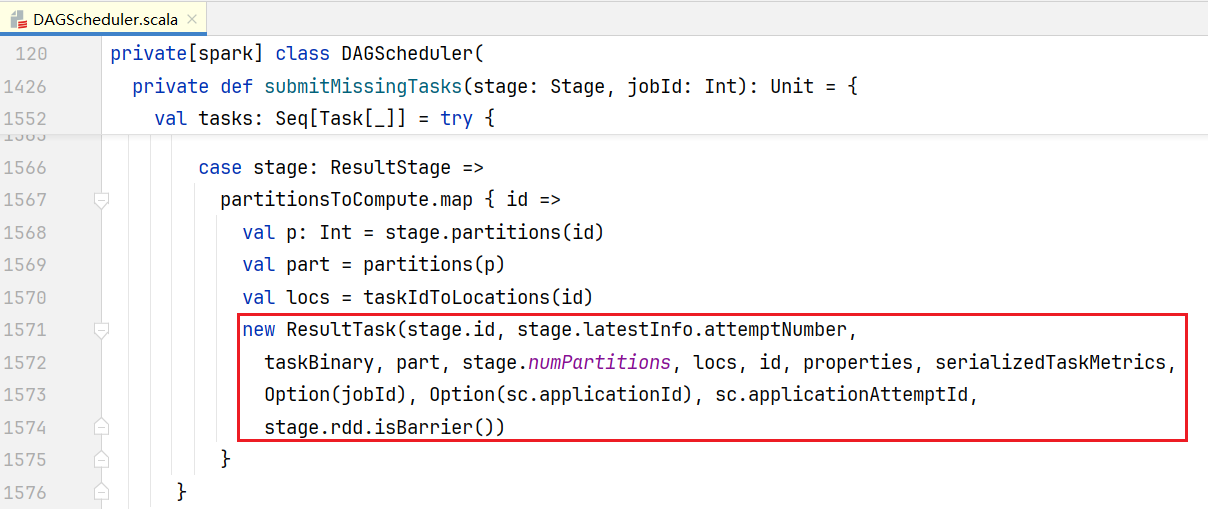
它在ResultTask.scala中,既然是任务,点击查看runTask(): 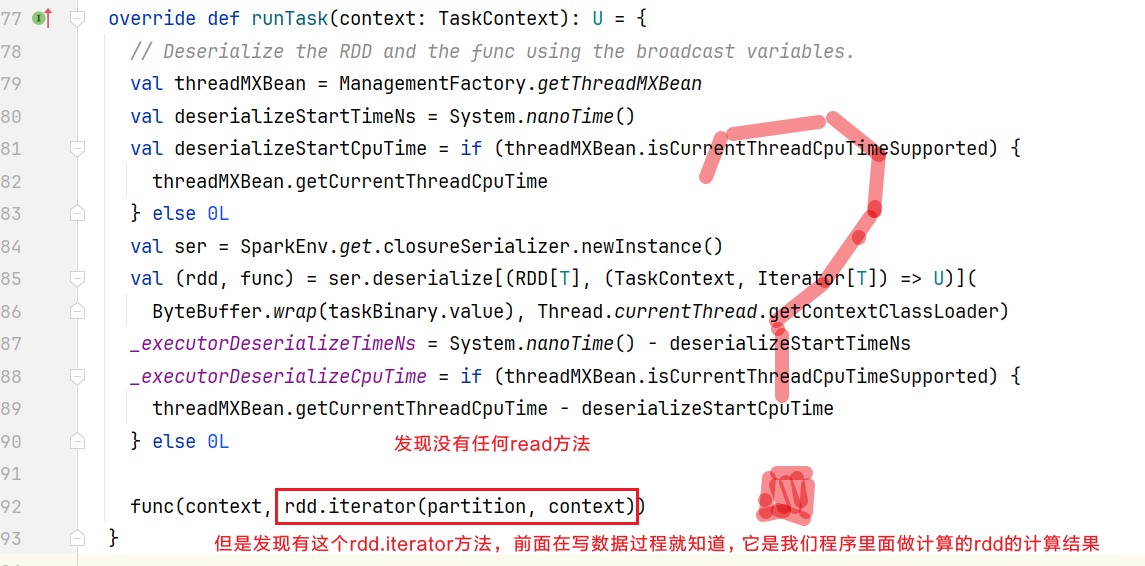 查看下rdd.iterator()方法呢:
final def iterator(split: Partition, context: TaskContext): Iterator[T] = {
    if (storageLevel != StorageLevel.NONE) {
        getOrCompute(split, context)
    } else {
        computeOrReadCheckpoint(split, context)
    }
}我们的wordCount程序没有设置storageLevel,点击computeOrReadCheckpoint()方法:
private[spark] def computeOrReadCheckpoint(split: Partition, context: TaskContext): Iterator[T] =
  {
    if (isCheckpointedAndMaterialized) {
      firstParent[T].iterator(split, context)
    } else {
      compute(split, context)
    }
}点击进入compute()方法,发现它是一个抽象方法: 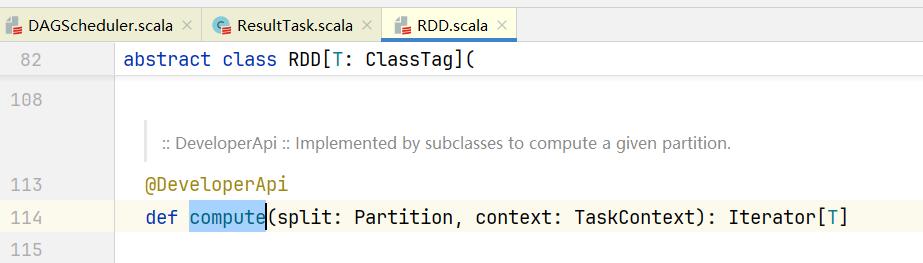 但我们知道当前RDD是ShuffledRDD, 打开ShuffledRDD.scala,查看compute()方法
 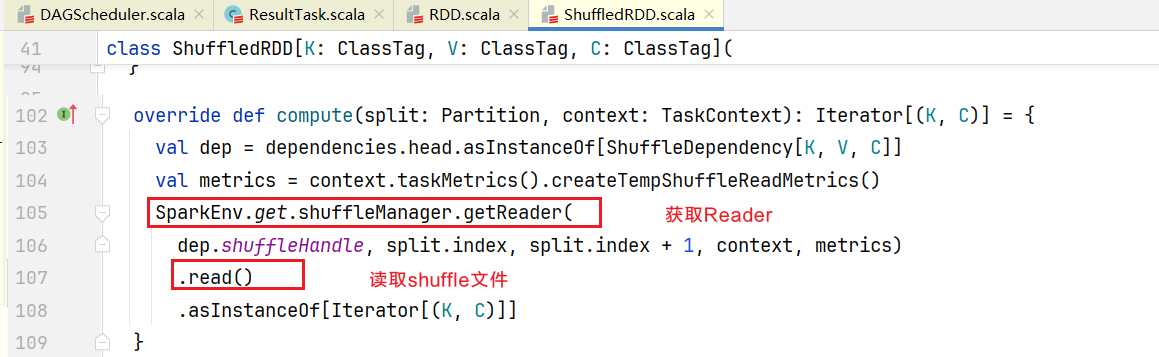 点击查看读取磁盘文件的Reader,getReader()是一个抽象方法,找到方法的实现SortShuffleManager.scala中的getReader()方法:
 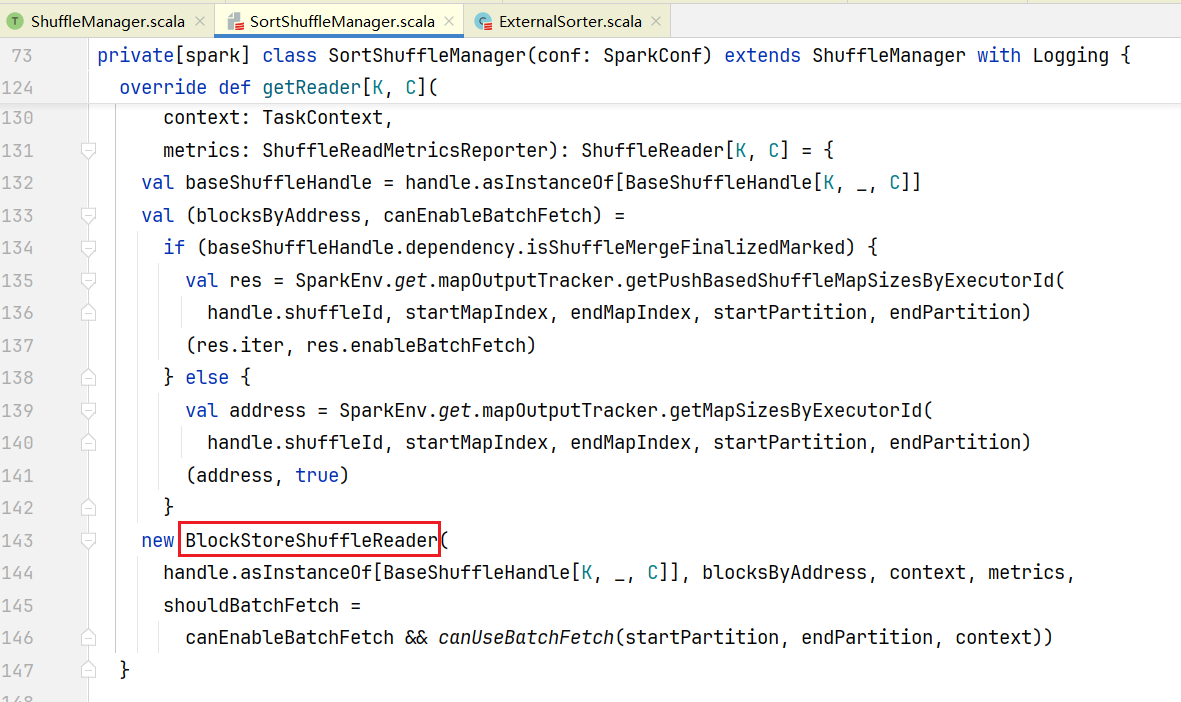 最终会得到一个BlockStoreShuffleReader对象,点击BlockStoreShuffleReader.scala中查看read()方法:
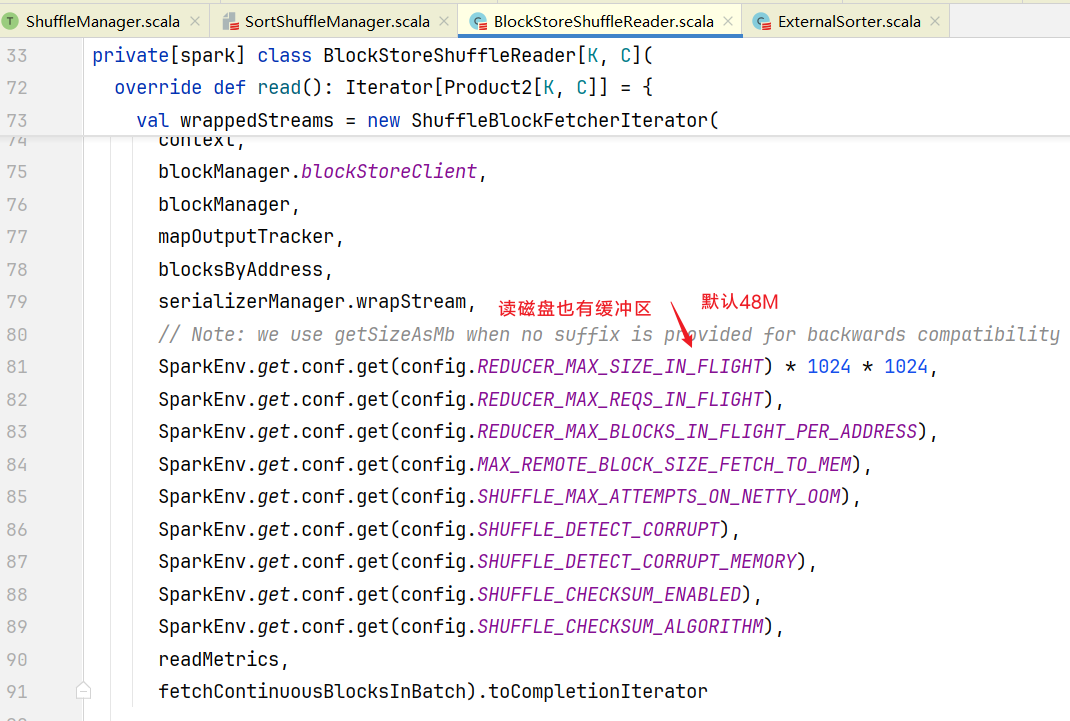
回到ShuffledRDD.scala的compute()方法里面, 可以看到传入参数shuffleHandle就会按照shuffle的规则进行读取数据