MySQL启停和重置密码
1. MySQL的启动
1.1 通过mysqld命令启动
[root@hadoop104 bin]# file mysqld
mysqld: ELF 64-bit LSB executable, x86-64, version 1 (GNU/Linux), dynamically linked (uses shared libs), BuildID[sha1]=85b5e6680395bccf7e1a31cb89fd8e6fc340cc0a, for GNU/Linux 2.6.32, not stripped可以看出mysqld是一个64的应用程序,不是shell脚本。
[root@hadoop104 mysql-8.0.39]# mysqld --defaults-file=/etc/my.cnf &
[1] 4939如果报错[Server] Fatal error: Please read "Security" section of the manual to find out how to run mysqld as root! 配置my.cnf,加入user=mysql:
[mysqld]
user=mysql1.2 通过mysqld_safe启动
[root@hadoop104 bin]# file mysqld_safe
mysqld_safe: POSIX shell script, ASCII text executable可见mysqld_safe就是一个启动shell脚本, 可以编辑内容,启动比较简单:
[root@hadoop104 bin]# mysqld_safe &
[1] 5006
[root@hadoop104 bin]# 2024-12-02T13:06:13.968496Z mysqld_safe Logging to '/opt/module/mysql-8.0.39/logs/mysql.log'.
2024-12-02T13:06:14.018143Z mysqld_safe Starting mysqld daemon with databases from /opt/module/mysql-8.0.39/data那么通过mysql和mysqld_safe进行启动mysql, 有啥区别呢? 可以看到使用mysqld_safe会额外启动一个进程,它是守护进程,当发现mysql进程没在运行或者被kill掉,这个守护进程就会重新启动mysql进程。
[root@hadoop104 bin]# ps -ef |grep mysql
root       5375    973  0 21:22 pts/0    00:00:00 /bin/sh /opt/module/mysql-8.0.39/bin/mysqld_safe
mysql      5669   5375  5 21:22 pts/0    00:00:00 /opt/module/mysql-8.0.39/bin/mysqld --basedir=/opt/module/mysql-8.0.39 --datadir=/opt/module/mysql-8.0.39/data --plugin-dir=/opt/module/mysql-8.0.39/lib/plugin --user=mysql --log-error=/opt/module/mysql-8.0.39/logs/mysql.log --pid-file=/opt/module/mysql-8.0.39/data/mysql.pid --socket=/tmp/mysql.sock --port=3306
root       5717    973  0 21:22 pts/0    00:00:00 grep --color=auto mysql
## 强制突然删掉mysql进程模拟mysql进程宕机
[root@hadoop104 bin]# kill -9 5669
[root@hadoop104 bin]# /opt/module/mysql-8.0.39/bin/mysqld_safe: 行 199:  5669 已杀死               env MYSQLD_PARENT_PID=5375 nohup /opt/module/mysql-8.0.39/bin/mysqld --basedir=/opt/module/mysql-8.0.39 --datadir=/opt/module/mysql-8.0.39/data --plugin-dir=/opt/module/mysql-8.0.39/lib/plugin --user=mysql --log-error=/opt/module/mysql-8.0.39/logs/mysql.log --pid-file=/opt/module/mysql-8.0.39/data/mysql.pid --socket=/tmp/mysql.sock --port=3306 < /dev/null > /dev/null 2>&1
2024-12-02T13:22:40.598566Z mysqld_safe Number of processes running now: 0
2024-12-02T13:22:40.607696Z mysqld_safe mysqld restarted
[root@hadoop104 bin]# ps -ef |grep mysql
root       5375    973  0 21:22 pts/0    00:00:00 /bin/sh /opt/module/mysql-8.0.39/bin/mysqld_safe
mysql      5733   5375 15 21:22 pts/0    00:00:00 /opt/module/mysql-8.0.39/bin/mysqld --basedir=/opt/module/mysql-8.0.39 --datadir=/opt/module/mysql-8.0.39/data --plugin-dir=/opt/module/mysql-8.0.39/lib/plugin --user=mysql --log-error=/opt/module/mysql-8.0.39/logs/mysql.log --pid-file=/opt/module/mysql-8.0.39/data/mysql.pid --socket=/tmp/mysql.sock --port=3306
root 5782 973 0 21:22 pts/0 00:00:00 grep --color=auto mysql1.3 通过mysqld_multi启动
mysqld_multi start 11.3 通过mysql.server启动
[root@hadoop104 bin]# file /etc/rc.d/init.d/mysql.server
/etc/rc.d/init.d/mysql.server: POSIX shell script, ASCII text executablemysql.server也是一个shell脚本文件。
2. MySQL的停止
2.1 通过客户端shutdown停止
mysql> shutdown;
Query OK, 0 rows affected (0.00 sec)
mysql> show databases;
ERROR 2013 (HY000): Lost connection to MySQL server during query
No connection. Trying to reconnect...
ERROR 2002 (HY000): Can't connect to local MySQL server through socket '/tmp/mysql.sock' (2)
ERROR:
Can't connect to the server2.2 通过mysqladmin停止
mysqladmin -uroot -proot -S /tmp/mysql.sock shutdown通过这种方式关闭mysql不太安全,暴露密码。
2.3 通过mysql.server停止
[root@hadoop104 bin]# /etc/rc.d/init.d/mysql.server stop
Shutting down MySQL....2024-12-02T13:32:31.360310Z mysqld_safe mysqld from pid file /opt/module/mysql-8.0.39/data/mysql.pid ended
 SUCCESS!
[1]+ 完成 mysqld_safemysql.server并没有使用用户名密码或者登录mysql来实现关闭,它的底层是如何实现关闭的呢?
查看mysql.server脚本可以发现里面stop部分的内容: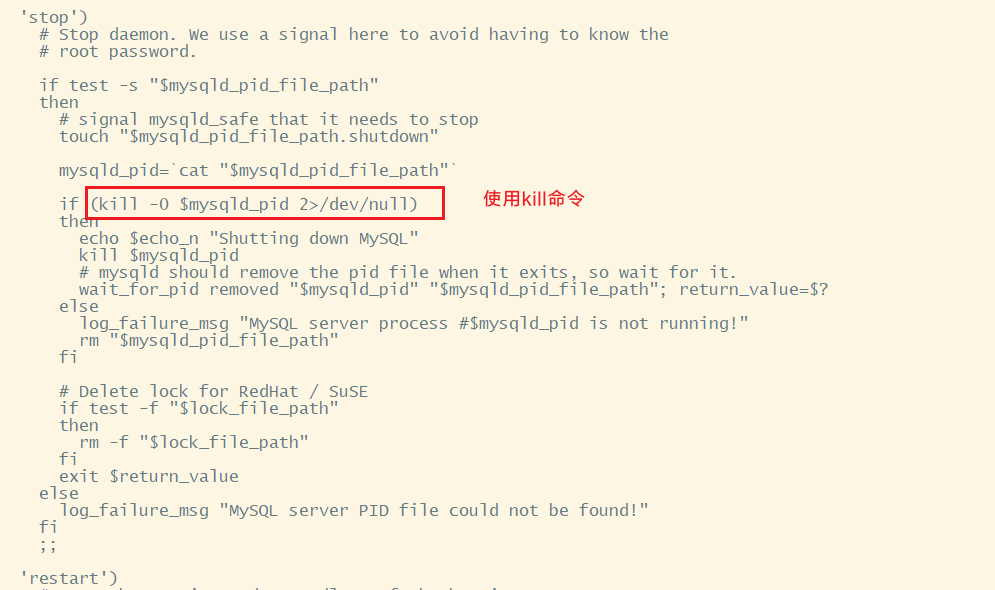 其中
其中kill -0 进程号表示检测当前进程号是否存在,mysql.server底层通过信号量进行关闭mysql进程。
3. 重置密码
如果忘记了root密码,如何才能接管MySQL数据库呢?可以配置my.cnf文件使用skip-grant-tables配置项:
[mysqld]
skip-grant-tablesskip-grant-tables是一个启动参数,用于跳过授权表的验证。将允许用户在没有提供有效凭据的情况下直接连接到MySQL服务器,并执行任意操作。保存并关闭配置文件,然后重新启动MySQL服务。
mysql> alter user 'root'@'%' identified by '123';
ERROR 1290 (HY000): The MySQL server is running with the --skip-grant-tables option so it cannot execute this statement在skip-grant-tables环境下,不能再通过alter,create user等sql命令方式去操作权限表了,如需修改密码需要直接操作mysql.user表:
mysql> UPDATE mysql.user SET authentication_string='' WHERE User='root';
Query OK, 1 row affected (0.01 sec)
Rows matched: 1  Changed: 1  Warnings: 0
mysql> set password for 'root'@'%'='root';
ERROR 1290 (HY000): The MySQL server is running with the --skip-grant-tables option so it cannot execute this statement
mysql> flush privileges;
Query OK, 0 rows affected (0.13 sec)
mysql> UPDATE mysql.user SET authentication_string='' WHERE User='root';
Query OK, 0 rows affected (0.00 sec)
Rows matched: 1 Changed: 0 Warnings: 0执行flush privileges命令会让MySQL实例重新读取授权表并将initialized变量设置为true,因此第二次的set password命令正常执行。