MySQL安装(Centos版)
1. 软件的下载
下载地址官网:https://downloads.mysql.com/archives/community/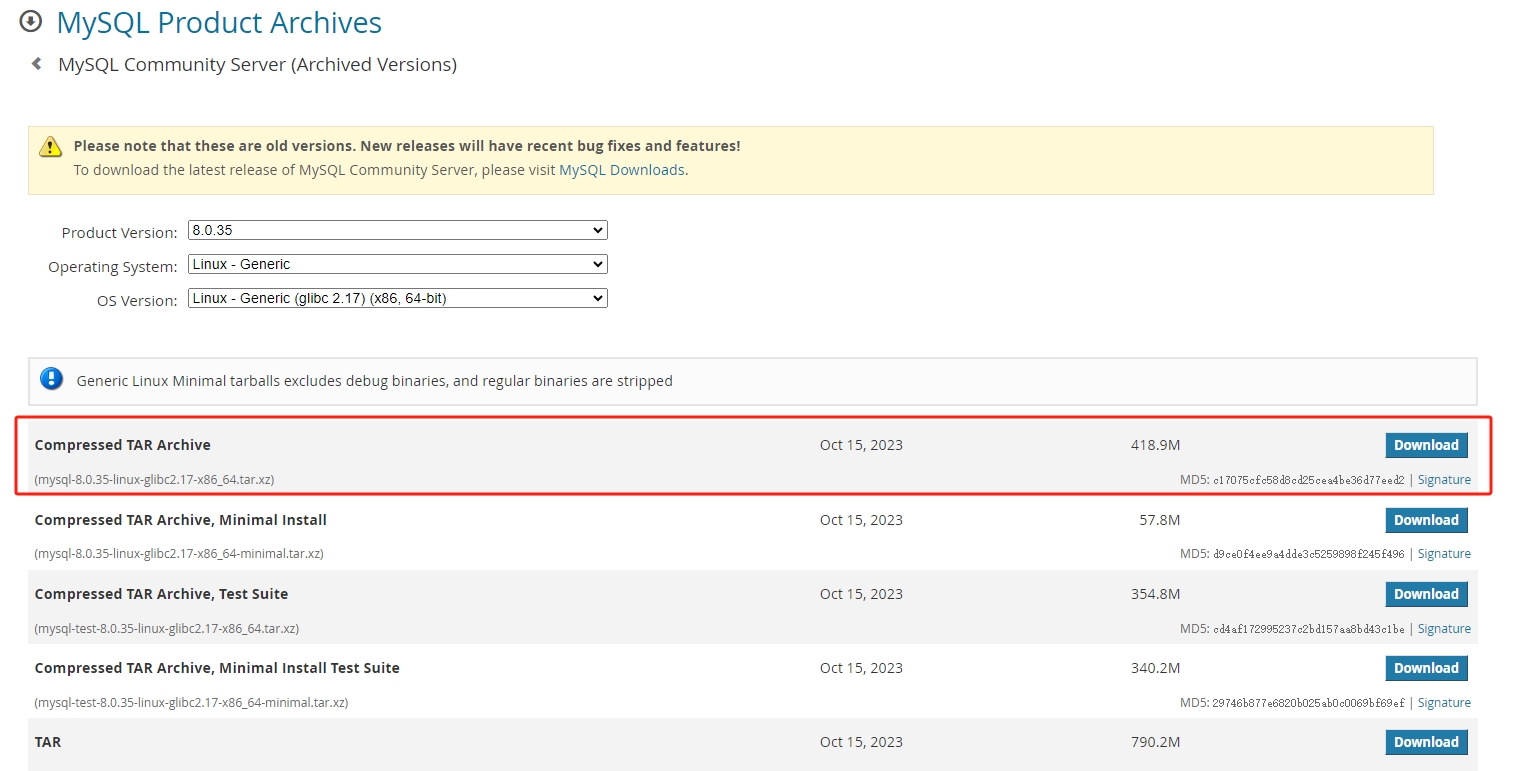 如果不确定自己的Linux上面的glibc版本,可以使用以下命令查看
[jack@hadoop105 ~]$ rpm -q glibc
glibc-2.17-326.el7_9.x86_64通过rpm包安装方式更加简单
[root@hadoop101 software]# wget https://cdn.mysql.com/archives/mysql-8.0/mysql-8.0.40-1.el7.x86_64.rpm-bundle.tar
[root@hadoop101 software]# tar -xvf mysql-8.0.40-1.el7.x86_64.rpm-bundle.tar
mysql-community-client-8.0.40-1.el7.x86_64.rpm
mysql-community-client-plugins-8.0.40-1.el7.x86_64.rpm
mysql-community-common-8.0.40-1.el7.x86_64.rpm
mysql-community-debuginfo-8.0.40-1.el7.x86_64.rpm
mysql-community-devel-8.0.40-1.el7.x86_64.rpm
mysql-community-embedded-compat-8.0.40-1.el7.x86_64.rpm
mysql-community-icu-data-files-8.0.40-1.el7.x86_64.rpm
mysql-community-libs-8.0.40-1.el7.x86_64.rpm
mysql-community-libs-compat-8.0.40-1.el7.x86_64.rpm
mysql-community-server-8.0.40-1.el7.x86_64.rpm
mysql-community-server-debug-8.0.40-1.el7.x86_64.rpm
mysql-community-test-8.0.40-1.el7.x86_64.rpm
## 先装依赖
[root@hadoop101 ~]# yum install libaio
## 安装mysql-community-server,需要安装顺序
[root@hadoop101 software]# rpm -ivh  mysql-community-icu-data-files-8.0.40-1.el7.x86_64.rpm
[root@hadoop101 software]# rpm -ivh mysql-community-common-8.0.40-1.el7.x86_64.rpm
[root@hadoop101 software]# rpm -ivh mysql-community-client-plugins-8.0.40-1.el7.x86_64.rpm
[root@hadoop101 software]# rpm -ivh mysql-community-libs-8.0.40-1.el7.x86_64.rpm
[root@hadoop101 software]# rpm -ivh mysql-community-client-8.0.40-1.el7.x86_64.rpm
[root@hadoop101 software]# rpm -ivh mysql-community-devel-8.0.40-1.el7.x86_64.rpm
[root@hadoop101 software]# rpm -ivh mysql-community-libs-compat-8.0.40-1.el7.x86_64.rpm
## 最后安装mysql-community-server
[root@hadoop101 software]# rpm -ivh mysql-community-server-8.0.40-1.el7.x86_64.rpm安装后配置见下面笔记。
2. 上传解压
2.1 上传到/opt/software目录
[root@hadoop105 software]# ll
总用量 543284
drwxr-xr-x. 2 root root        202 3月   5 15:30 hadoop_source
-rw-r--r--. 1 jack wheel 113609072 3月  11 21:53 kafka_2.12-3.6.1.tgz
-rw-r--r--. 1 root root  439284500 3月  13 22:09 mysql-8.0.35-linux-glibc2.17-x86_64.tar.xz
-rw-r--r--. 1 root root 3424072 3月 5 22:34 redis-7.2.4.tar.gz2.2 解压压缩包
解压到/opt/module,MySQL官方推荐在usr/local下面
[root@hadoop105 software]# tar -xvf mysql-8.0.35-linux-glibc2.17-x86_64.tar.xz -C /opt/module/
[root@hadoop105 software]# cd /opt/module/
[root@hadoop105 local]# mv mysql-8.0.35-linux-glibc2.17-x86_64 mysql-8.0.35
[root@hadoop105 local]# cd mysql-8.0.35
[root@hadoop105 mysql-8.0.35]# mkdir data logs
[root@hadoop105 mysql-8.0.35]# touch logs/mysql.log
[root@hadoop105 mysql-8.0.35]# touch logs/mysql.pid3. 用户创建和配置权限
[root@hadoop105 mysql-8.0.35]# groupadd mysql
# 限制mysql用户不能登陆,也就是专用提供给MySQL程序
[root@hadoop105 mysql-8.0.35]# useradd -r -g mysql -s /bin/false mysql
[root@hadoop105 mysql-8.0.35]# chown -R mysql:mysql data logs
[root@hadoop105 mysql-8.0.35]# chmod 750 data logs4. 安装MySQL
4.1 卸载系统自带的MySQL
[root@hadoop105 mysql-8.0.35]# rpm -qa | grep -i mariadb
mariadb-libs-5.5.68-1.el7.x86_64
[root@hadoop105 mysql-8.0.35]# rpm -qa | grep mysql
## 如果有的话需要卸载
[root@hadoop105 mysql-8.0.35]# rpm -e --nodeps mariadb-libs4.2 安装依赖
[root@hadoop105 mysql-8.0.35]# yum -y install libaio4.3 配置数据库
## 如果有/etc/my.cnf文件先删除
[root@hadoop105 mysql-8.0.35]# vi /etc/my.cnf
[client]
default_character_set=utf8

[mysqld]
#Mysql服务的唯一编号 每个mysql服务Id需唯一
server-id=1
#服务端口号 默认3306
port=3306
#mysql安装根目录
basedir=/opt/module/mysql-8.0.35
#mysql数据文件所在位置
datadir=/opt/module/mysql-8.0.35/data
user=mysql
#错误日志
log_error=/opt/module/mysql-8.0.35/logs/mysql.log
#开启慢查询日志
slow_query_log=1
#慢查询时间 超过3秒则为慢查询
long_query_time=3
#慢查询日志目录
slow_query_log_file=/opt/module/mysql-8.0.35/logs/mysql-slow.log
#pid
pid-file=/opt/module/mysql-8.0.35/logs/mysql.pid
#设置socket文件所在目录
socket=/tmp/mysql.sock
#设置临时目录
tmpdir=/tmp
#数据库默认字符集,主流字符集支持一些特殊表情符号(特殊表情符占用4个字节)
character-set-server=utf8mb4
#数据库字符集对应一些排序等规则,注意要和character-set-server对应
collation-server=utf8mb4_zh_0900_as_cs
#设置client连接mysql时的字符集,防止乱码
init_connect='SET NAMES utf8mb4'
#最大连接数
max_connections=400
#是否对sql语句大小写敏感,1表示不敏感
lower_case_table_names=14.4 初始化数据库
[root@hadoop105 mysql-8.0.35]# bin/mysqld --user=mysql --basedir=/opt/module/mysql-8.0.35 --datadir=/opt/module/mysql-8.0.35/data/ --initialize
[root@hadoop105 mysql-8.0.35]# cat logs/mysql.log
2024-03-14T02:42:49.042659Z 0 [System] [MY-013169] [Server] /opt/module/mysql-8.0.35/bin/mysqld (mysqld 8.0.35) initializing of server in progress as process 61133
2024-03-14T02:42:49.050797Z 1 [System] [MY-013576] [InnoDB] InnoDB initialization has started.
2024-03-14T02:42:49.756972Z 1 [System] [MY-013577] [InnoDB] InnoDB initialization has ended.
2024-03-14T02:42:52.727837Z 6 [Note] [MY-010454] [Server] A temporary password is generated for root@localhost: XsFWHL%x1Nka默认会创建四个数据库:information_schema\mysql\performance_schema\sys。可以看到打印日志中有数据库root的密码,需要保存起来方便后续使用,如果没有记下,只需要清空data文件夹,然后重新执行初始化数据库操作。
提示
information_schema库:元数据库,保存数据库表信息。
mysql库: 用户权限库,保存用户账号密码。
performance_schema库:性能监控库。
sys库:5.7版本之后新增的库,主要是performance_schema库比较专业难懂,sys库基于performance_schema库创建视图便于查看。
4.5 配置数据库自启动
[root@hadoop105 mysql-8.0.35]# cp support-files/mysql.server /etc/init.d/5. 启动数据库
[root@hadoop105 mysql-8.0.35]# /etc/init.d/mysql.server start
Starting MySQL.. SUCCESS!
[root@hadoop105 mysql-8.0.35]# ps -ef |grep mysql
root      61262      1  0 10:44 pts/1    00:00:00 /bin/sh /opt/module/mysql-8.0.35/bin/mysqld_safe --datadir=/opt/module/mysql-8.0.35/data --pid-file=/opt/module/mysql-8.0.35/logs/mysql.pid
mysql     61577  61262 11 10:44 pts/1    00:00:01 /opt/module/mysql-8.0.35/bin/mysqld --basedir=/opt/module/mysql-8.0.35 --datadir=/opt/module/mysql-8.0.35/data --plugin-dir=/opt/module/mysql-8.0.35/lib/plugin --user=mysql --log-error=/opt/module/mysql-8.0.35/logs/mysql.log --pid-file=/opt/module/mysql-8.0.35/logs/mysql.pid --socket=/tmp/mysql.sock --port=3306
root 61636 55617 0 10:44 pts/1 00:00:00 grep --color=auto mysqlMySQL启动后,有两个进程,可见MySQL是一个多进程程序。
6. 配置mysql服务
- 创建service文件
[root@hadoop105 mysql-8.0.35]# vi /usr/lib/systemd/system/mysql.service
[Unit]
Description=MySQL server
After=syslog.target network.target

[Service]
User=mysql
Group=mysql
Type=forking
TimeoutSec=0
#PermissionsStartOnly=true
ExecStart=/opt/module/mysql-8.0.35/bin/mysqld --defaults-file=/etc/my.cnf --daemonize
LimitNOFILE=65535
Restart=on-failure
RestartSec=3
RestartPreventExitStatus=1
PrivateTmp=false

[Install]
WantedBy=multi-user.target- 重新加载systemctl配置
[root@hadoop105 system]# systemctl daemon-reload- 关闭MySQL数据库
[root@hadoop105 init.d]# /etc/init.d/mysql.server stop
Shutting down MySQL.. SUCCESS!
[root@hadoop105 init.d]# ps -ef |grep mysql
root 62555 55617 0 11:01 pts/1 00:00:00 grep --color=auto mysql- 启动MySQL服务
systemctl start mysql提示
systemctl服务无法感知: 通过/etc/init.d/mysql.server脚本直接启停MySQL数据库。建议如果配置了systemctl服务后面直接使用systemctl服务代替脚本启动。
7. 客户端连接
使用mysql命令进行连接
## 为了方便使用mysql命令,创建软连接
[root@hadoop105 mysql-8.0.35]# ln -s /opt/module/mysql-8.0.35/bin/mysql /usr/bin/
## 使用之前日志文件中的密码本地登陆
[root@hadoop105 usr]# mysql -uroot -p
Enter password:
Welcome to the MySQL monitor.  Commands end with ; or \g.
Your MySQL connection id is 9
Server version: 8.0.35

Copyright (c) 2000, 2023, Oracle and/or its affiliates.

Oracle is a registered trademark of Oracle Corporation and/or its
affiliates. Other names may be trademarks of their respective
owners.

Type 'help;' or '\h' for help. Type '\c' to clear the current input statement.

mysql>
mysql> show databases;
ERROR 1820 (HY000): You must reset your password using ALTER USER statement before executing this statement.MySQL提示数据库使用之前需要重置密码。
8. 重置密码
mysql> ALTER USER 'root'@'localhost' IDENTIFIED BY 'root';
Query OK, 0 rows affected (0.06 sec)9. 远程登录设置
-- 切换到mysql数据库
mysql> use mysql;
Reading table information for completion of table and column names
You can turn off this feature to get a quicker startup with -A

Database changed
-- 查询用户表
mysql> select Host,User from user;
+-----------+------------------+
| Host      | User             |
+-----------+------------------+
| localhost | mysql.infoschema |
| localhost | mysql.session    |
| localhost | mysql.sys        |
| localhost | root             |
+-----------+------------------+
4 rows in set (0.00 sec)
-- 授权root用户任何IP访问
mysql> update user set host = '%' where user ='root';
Query OK, 1 row affected (0.01 sec)
Rows matched: 1  Changed: 1  Warnings: 0
-- 刷新权限
mysql> flush privileges;
Query OK, 0 rows affected (0.00 sec)10. 客户端个性化配置
如果觉得mysql命令行客户端每次输入密码登录繁琐,可以配置免密登录。编辑my.cnf文件
[root@hadoop102 conf]# vim my.cnf
## 在client节点添加用户名密码
[client]
user=root
password=123456在每次登录的时候,mysql指令就会去读取my.cnf文件
bash-5.1# mysql
Welcome to the MySQL monitor.  Commands end with ; or \g.
Your MySQL connection id is 471
Server version: 8.4.3 MySQL Community Server - GPL

Copyright (c) 2000, 2024, Oracle and/or its affiliates.

Oracle is a registered trademark of Oracle Corporation and/or its
affiliates. Other names may be trademarks of their respective
owners.

Type 'help;' or '\h' for help. Type '\c' to clear the current input statement.

mysql>每次连接还可以设置连接提示,提示当前在连接信息,编辑my.cnf文件
## 增加mysql节点内容
[mysql]
prompt=(\\u@\\h)[\\d]>\\再次登录mysql:
bash-5.1# mysql
Welcome to the MySQL monitor.  Commands end with ; or \g.
Your MySQL connection id is 472
Server version: 8.4.3 MySQL Community Server - GPL

Copyright (c) 2000, 2024, Oracle and/or its affiliates.

Oracle is a registered trademark of Oracle Corporation and/or its
affiliates. Other names may be trademarks of their respective
owners.

Type 'help;' or '\h' for help. Type '\c' to clear the current input statement.

(root@localhost)[(none)]>use gmall;
Reading table information for completion of table and column names
You can turn off this feature to get a quicker startup with -A

Database changed
(root@localhost)[gmall]>11. 防火墙端口配置
# 查看 firewalld 服务状态
[root@hadoop105 mysql-8.0.35]# systemctl status firewalld
# 开放3306端口
[root@hadoop105 mysql-8.0.35]# firewall-cmd --zone=public --add-port=3306/tcp --permanent
# 配置立即生效
[root@hadoop105 mysql-8.0.35]# firewall-cmd --reload12. 远程客户端连接
12.1 使用DBeaver连接
DBeaver是一个通用的数据库管理工具和SQL客户端,支持所有流行的数据库:MySQL、PostgreSQL、SQLite、Oracle、DB2、SQL Server、Sybase、MS Access等。 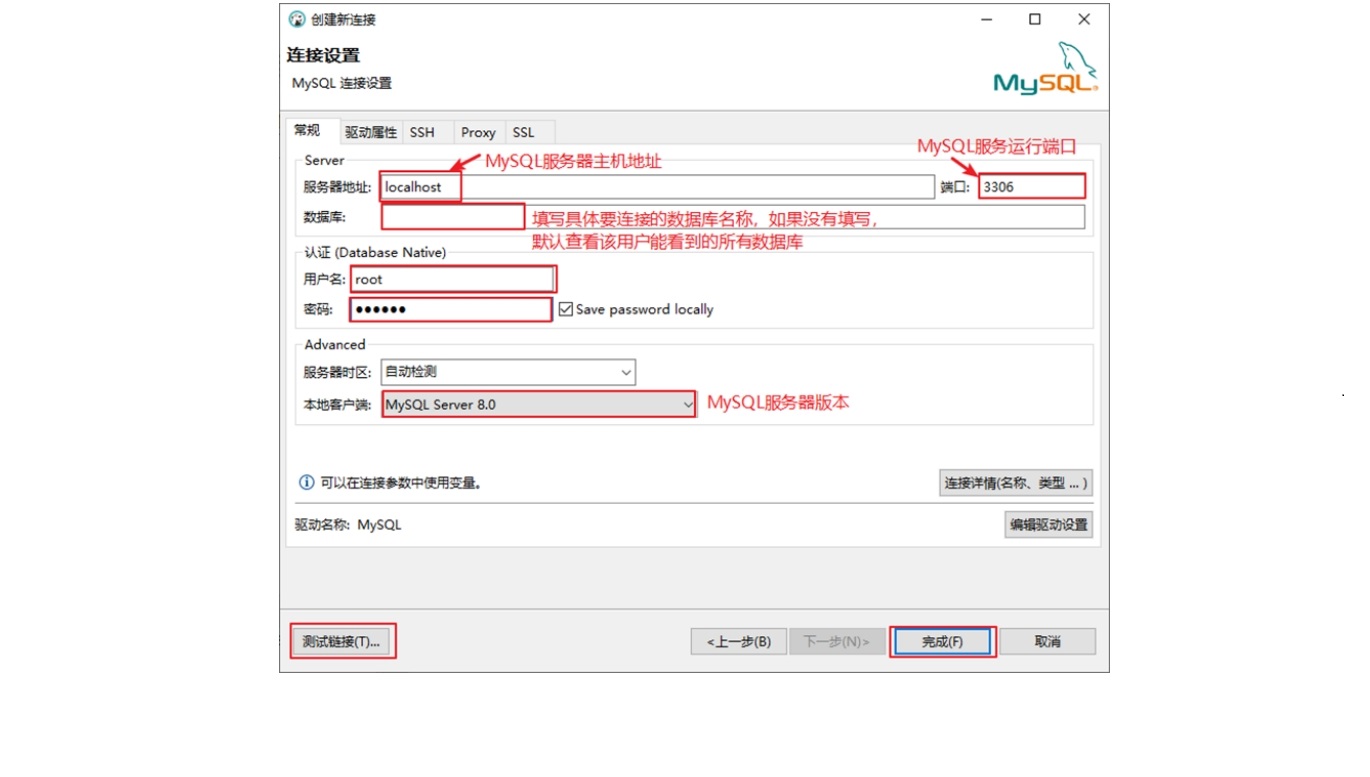 如果出现连接出错: 连接出现
 Public Key Retrieval is not allowed, 这是因为MySQL 8及以上版本对客户端连接安全性要求更高,默认使用密码插件caching_sha2_password时,要求加密通信并且不允许通过不安全的方式获取服务器的公钥。解决办法有两个:
- 在客户端JDBC的url中添加的参数:
allowPublicKeyRetrieval=true和useSSL=false - 调整当前连接用户的默认密码插件,换成
mysql_native_password即可
-- 使用密码策略为mysql_native_password
ALTER USER 'username'@'%' IDENTIFIED WITH mysql_native_password BY 'password';
FLUSH PRIVILEGES;